
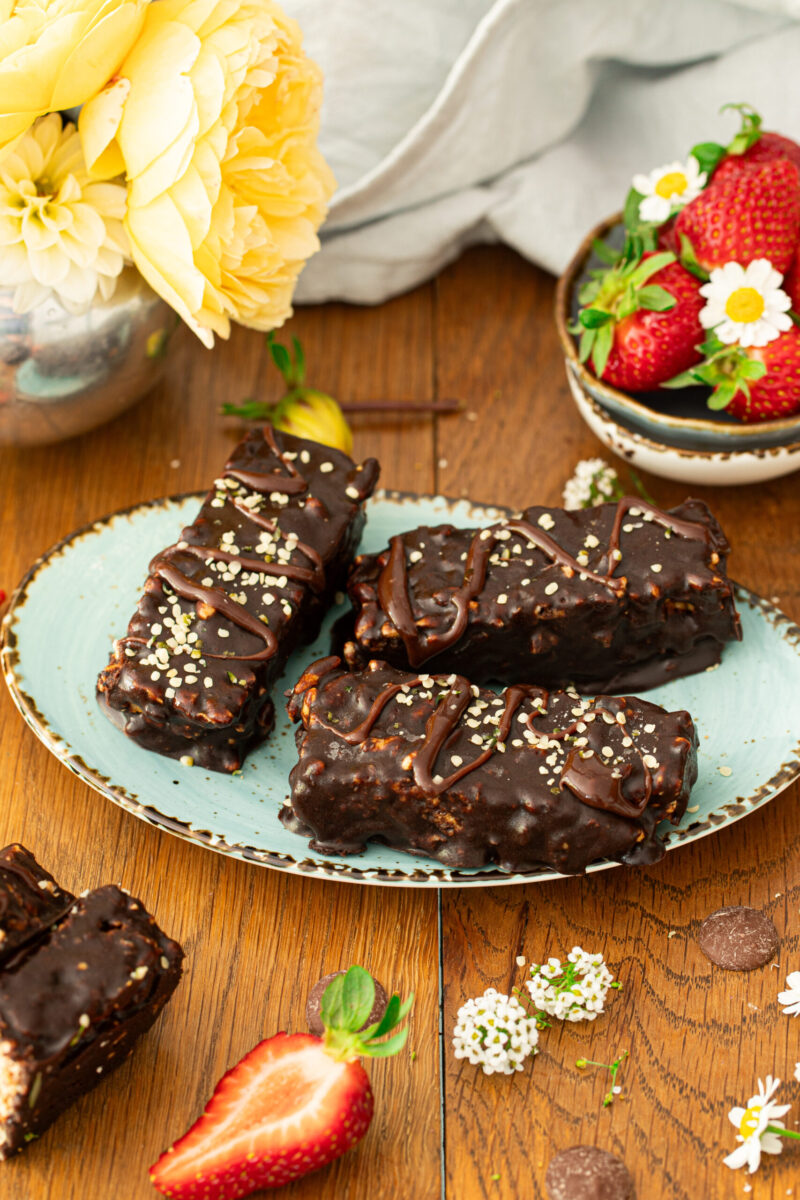
PB Chocolate Rice Crispy Treats (Vegan). These bars are not baked, have no marshmallows, and are totally vegan-friendly with no gelatine or animal products involved. If that’s not enough, they’re dairy-free, and packed with protein from healthy peanut butter. The best part? You can whip them up in no time, no oven is required!

The cutest little rice krispie treats with peanut butter and chocolate for you 👆🏼🥜
Jump to:
- CHOCOLATE PEANUT BUTTER RICE CRISPY BARS
- ❤️ HERES WHY YOU WILL LOVE THESE CHOCOLATE COVERED RICE KRISPIE TREATS 🍫
- 🍫 MORE DESSERT RECIPE TO TRY NEXT TIME
- 🥄 INGREDIENTS NEEDED AND SUBSTITUTIONS
- 👩🏼🍳 HOW TO MAKE PB CHOCOLATE RICE CRISPY TREATS
- 📝 TIPS AND TRICKS
- ❓FAQS
- MAKE-AHEAD AND STORAGE
- make-ahead
- storage
CHOCOLATE PEANUT BUTTER RICE CRISPY BARS
Whether you're a fan of old-fashioned Rice Crispy Treats or looking for a healthy upgrade with dark chocolate, these PB Chocolate Rice Crispy Treats bars are a total game-changer.
They come together in an 8x8 pan, cut perfectly into squares (or bars), and are finished with a gorgeous drizzle of chocolate on top. Plus, you can even add a sprinkle of hemp seeds for an extra health boost!
Just like chocolate-covered pineapple, these bars are your go-to for a healthy snack or dessert that's full of flavor and good-for-you ingredients.
Whether you're after a protein-packed treat, or just craving something chocolatey and crunchy, these PB Chocolate Rice Crispy Treats are delicious!

❤️ HERES WHY YOU WILL LOVE THESE CHOCOLATE COVERED RICE KRISPIE TREATS 🍫
- loaded with peanut butter + chocolate
- high in protein and natural fats
- soft + chewy
- minimal ingredients
- no bake
- perfect for lunch boxes

🍫 MORE DESSERT RECIPE TO TRY NEXT TIME


🥄 INGREDIENTS NEEDED AND SUBSTITUTIONS
PEANUT BUTTER: Good quality, runny PB.
MAPLE SYRUP: This adds sweetness and helps bind the rice krispie treats.
RICE CRISPY CEREAL: It's the star of the show. ⭐️
CHOCOLATE CHIPS: Use vegan if are making this vegan-friendly or dairy-free.
COCONUT OIL: This helps the chocolate to melt. It makes the chocolate smooth and silky.
HEMP SEEDS: Optional for garnish.

👩🏼🍳 HOW TO MAKE PB CHOCOLATE RICE CRISPY TREATS
Note: Please scroll to the full printable recipe card at the bottom for ingredient quantities and the method.
Prep the Pan: Line an 8x8-inch pan with parchment paper, leaving some extra hanging over the sides to make lifting the treats out easier. Set aside.
Warm the Peanut Butter Mix: In a small saucepan or microwave-safe bowl, combine the peanut butter and maple syrup. Warm them together over low heat (or microwave in 30-second increments) until everything is smooth and combined. Don’t let it boil—just warm enough to stir easily.
Mix in the Rice Crispies: Once the peanut butter mixture is warm and silky, add in the rice crispy cereal. Stir gently until all the cereal is well coated in that delicious peanut butter-maple mix.
Press It Down: Transfer the mixture to the prepared 8x8 pan and press it firmly down into an even layer. You can use a spatula or even your hands (just grease them up a bit to avoid sticking).
Chocolate Time!: In a microwave or over a double boiler, melt the dark chocolate chips with the coconut oil until smooth.
Once the bars are firm, lift the treats out using the parchment paper and cut them into squares or bars—whatever you fancy.
Now, you have two options:
- Option 1: Once the bars are firm, lift the treats out using the parchment paper and cut them into squares or bars—whatever shape speaks to you! Use a fork (or two forks) to dip each bar into the melted chocolate, coating them evenly.
- Option 2: Keep the bars in the pan and pour the melted chocolate over the top, spreading it evenly to cover.
Optional Garnish: If you want to level up the healthy factor, sprinkle hemp seeds over the top of the melted chocolate. They add a nice crunch and a boost of protein and healthy fats.
Pop the pan into the fridge for about 30 minutes or until the chocolate has set.

📝 TIPS AND TRICKS
Use Natural Peanut Butter: If you're aiming for a healthier snack, opt for natural peanut butter (the kind that’s just peanuts and maybe a pinch of salt). It has a runnier consistency, making it easier to mix with the maple syrup, and is packed with protein and healthy fats.
Press Firmly: When pressing the PB Chocolate Rice Crispy mixture into the pan, make sure to press it down firmly to ensure that the bars hold together when sliced. You can use the back of a spatula or even a flat-bottomed glass to help.
Don’t Overheat the Chocolate: When melting the chocolate, be careful not to overheat it. If using a microwave, heat it in 20-30-second intervals, stirring in between. Overheated chocolate can become grainy or seize up.
Fork Method for Chocolate Coating: If you choose the dipping option for the chocolate coating, use two forks to hold the bars from the bottom, allowing the excess chocolate to drip off before placing them on parchment paper to set. This helps you avoid a mess and ensures an even coating.
Add a Crunchy Garnish: Sprinkling hemp seeds or even crushed nuts on top of the chocolate before it sets. Not only does it give an extra crunch but also adds a nutrient boost. Chia seeds or flaxseeds can also work for added texture and fiber!
Customize the Sweetness: If you prefer your treats less sweet, use a darker chocolate (70% cacao or higher) for the coating.
Room Temp vs. Fridge: These bars taste amazing straight from the fridge, where they’ll be firmer and have a nice crunch. But if you like a softer, gooier texture, let them sit at room temperature for 10-15 minutes before serving.

❓FAQS
The peanut butter and maple syrup mixture acts as the "glue". If you don't have enough of this binding ingredient, the cereal won't stick together well.
Make sure you're using the right ratio of peanut butter and maple syrup. If your mix feels dry, you can add a little more warm peanut butter or maple syrup to help bind everything.
Cutting Too Soon: If you cut into the bars too soon, they may not have had enough time to firm up.
MAKE-AHEAD AND STORAGE
make-ahead
Prep in Advance: These treats are perfect for making ahead because they store so well! You can make a batch a day or two in advance and they’ll still be fresh and delicious when you're ready to enjoy them.
Freeze for Later: If you want to make them even further ahead, these bars are freezer-friendly. Simply prepare, cut, and freeze in an airtight container (separating layers with parchment paper) for up to 2 months.
storage
Refrigeration: Keep the bars in the fridge. They’ll stay fresh for up to a week this way. Just note that refrigerating them will make the chocolate coating more solid and the bars slightly firmer.
Freezing: To store for longer, freeze the bars in an airtight container for up to 2 months. When you’re ready to enjoy, let them thaw in the fridge or at room temperature for about 10-15 minutes.
Did you make this recipe? Let me know what you think by leaving a ★★★★★ star rating & comment below. It genuinely helps me & I really appreciate your support! Nikki 💚
Print
PB CHOCOLATE RICE CRISPY TREATS (VEGAN)
- Total Time: 10 min prep + 5 min cook time + 1 hour fridge time
- Yield: 16 1x
- Diet: Vegan
Description
PB Chocolate Rice Crispy Treats (Vegan). These bars are not baked, have no marshmallows, and are totally vegan-friendly with no gelatine or animal products involved. If that’s not enough, they’re dairy-free, and packed with protein from peanut butter. The best part? You can whip them up in no time, no oven is required!
Ingredients
¾ cup peanut butter (runny peanut butter works well. Use a good quality PB)
6 tablespoons maple syrup
3 cups of rice crispies
1 cup chocolate chips (use vegan if you are making these vegan-friendly)
1 teaspoon coconut oil
3 teaspoons hemp seeds (optional)
Instructions
Prep the Pan: Line an 8x8-inch pan with parchment paper, leaving some extra hanging over the sides to make lifting the treats out easier. Set aside.
Warm the Peanut Butter Mix: In a small saucepan or microwave-safe bowl, combine the peanut butter and maple syrup. Warm them together over low heat (or microwave in 30-second increments) until everything is smooth and combined. Don’t let it boil—just warm enough to stir easily.
Mix in the Rice Crispies: Once the peanut butter mixture is warm and silky, add in the rice crispy cereal. Stir gently until all the cereal is well coated in that delicious peanut butter-maple mix.
Press It Down: Transfer the mixture to the prepared 8x8 pan and press it firmly down into an even layer. You can use a spatula or even your hands (just grease them up a bit to avoid sticking).
Chocolate Time!: In a microwave or over a double boiler, melt the dark chocolate chips with the coconut oil until smooth.
Once the bars are firm, lift the treats out using the parchment paper and cut them into squares or bars—whatever you fancy!
Now, you have two options:
Option 1: Once the bars are firm, lift the treats out using the parchment paper and cut them into squares or bars—whatever shape speaks to you! Use a fork (or two forks) to dip each bar into the melted chocolate, coating them evenly.
Option 2: Keep the bars in the pan and pour the melted chocolate over the top, spreading it evenly to cover.
Optional Garnish: If you want to level up the healthy factor, sprinkle hemp seeds over the top of the melted chocolate. They add a nice crunch and a boost of protein and healthy fats.
Pop the pan into the fridge for about 30 minutes or until the chocolate has set.
Notes
Use natural peanut butter: If you are aiming for a healthier snack, opt for natural peanut butter (the kind that's just peanuts and maybe a pinch of salt). It has a runnier consistency, making it easier to mix with the maple syrup, and is packed with protein and healthy fats.
Don't overheat the chocolate: When melting the chocolate, be careful not to overheat. If using a microwave, heat it in 20 -30-second intervals, stirring in between. Overheated chocolate can become grainy and seize up.
Press-firmly: when pressing the peanut butter rice crispy mixture into the pan, make sure to press it down firmly to ensure that the bars hold together when sliced. You can use the back of a spatula or even a flat-bottomed glass to help you.
- Prep Time: 10 minutes
- Cook Time: 5 minutes
- Category: snacks
- Method: no-bake
- Cuisine: American


Comments
No Comments